As a software engineer, I spend a lot of time on a computer and a vast majority of that time is spent editing text and working with command line interfaces. On any given day, I might work on my corporate Linux workstation, corporate MacBook, personal MacBook, and/or my personal MacBook plugged into my Apple Cinema Display in clamshell mode. Fairly typical for geeks like me. Jumping between systems isn't too disruptive thanks to many tools and services moving from native applications to web applications. Long live the open web!
However, one aspect of constantly switching systems that I hate is how different keyboard layouts and configurations mess with my hard-earned muscle memory. So, over the last few months, I've been refining my approach to keyboard consistency. It's not perfect but I think it's good enough to share.
Goals
- Optimize for keeping my fingers on the home row as much as possible.
- Reduce dependence on the mouse, trackpad, and arrow keys.
- Consistent custom mappings.
- Support for macOS and Linux.
- Portability (i.e. easy to set up and sync between systems).
- Prioritize my tmux and Vim experience.
Hardware
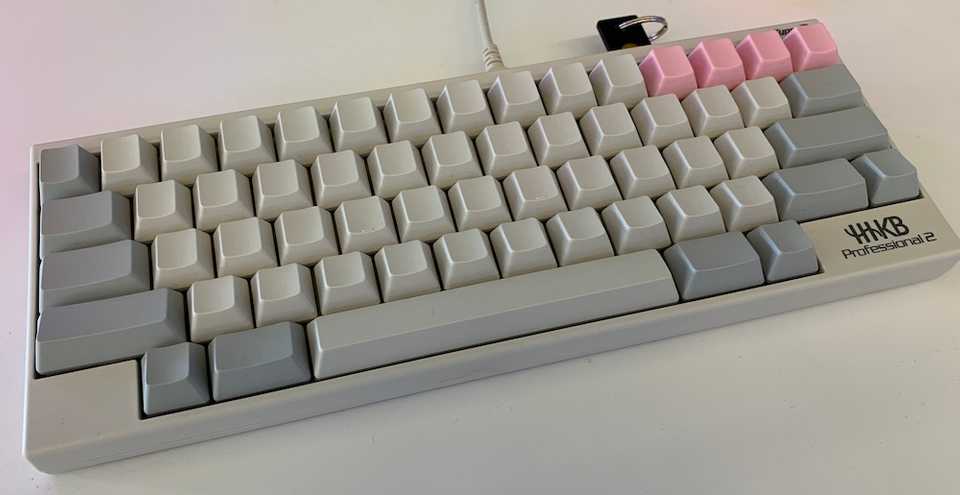
I currently only use two different physical layouts: the standard MacBook layout and the HHKB Pro 2 layout. I went a bit off the rails and bought two HHKBs so I could have one at the office and one at home. I regret nothing.
As you can see, the HHKB layout isn't too different from a standard MacBook layout. The most noticeable differences are the lack of arrow keys, lack of F-row keys, and fewer modifier keys on the bottom row. The delete key has also been moved directly above the return key. Most of these keys can be accessed via a second "layer" using the function key in the lower-right corner (but that's really annoying and I avoid that at all costs). Keys can be further customized via hardware DIP switches on the back of the keyboard.
Both of the HHKBs I own have blank keycaps...partially because I wanted to tinker with the layout and not have mislabeled keys, but mostly because I love the minimalist look.
Goodbye Caps Lock
The first order of business is making better use of the Caps Lock key. Nobody needs it and it's taking up valuable real estate on the home row. If you only take away one thing from this post, this should be it.
Start by remapping it to Control. For some people that may be sufficient. In fact, the HHKB supports this out of the box by setting one of the DIP switches. But I like to take it one step further and remap it to Control when pressed with another key and Escape if it's pressed on it's own. This gives me extremely easy access to the Escape key for exiting Insert mode in Vim and a much more ergonomic way to use Control as a modifier key (Ctrl+C, Ctrl+P, etc.).
macOS
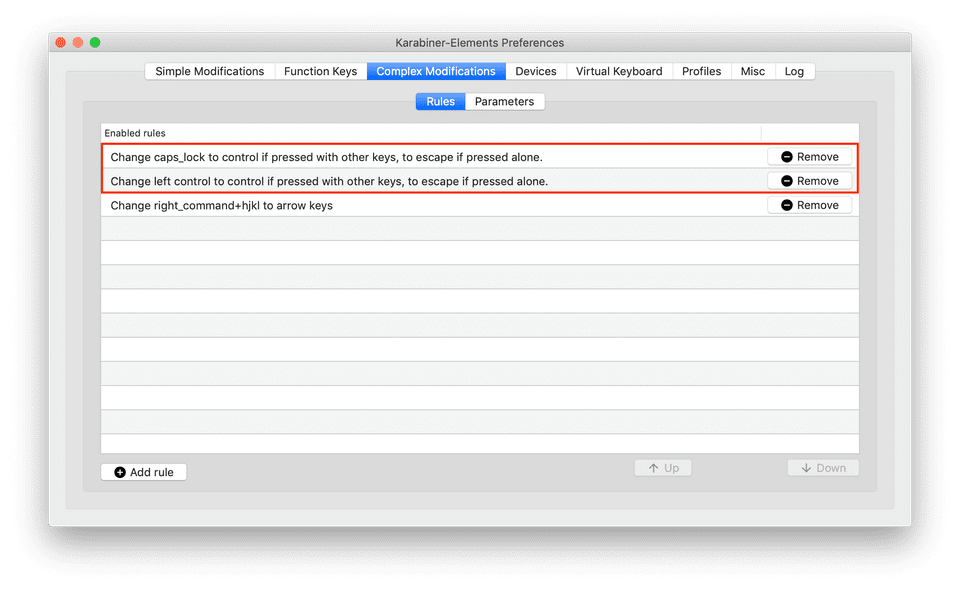
The best way I've found to accomplish this on macOS is a tool called Karabiner Elements. It's brilliant. You'll need to add a "complex modification" or two to get this working. I added two modifications so I can use the same Karabiner configuration for both keyboard layouts. In my setup, this behavior gets applied to the Caps Lock key on my MacBook and to the left Control key on my HHKB. I wasn't able to find an easy way to import both of these modifications, so here is the relevant JSON you'll need to add to your ~/.config/karabiner/karabiner.json file (it should get created when you install Karabiner).
...omitted...

{
    "description": "Change caps_lock to control if pressed with other keys, to escape if pressed alone.",
    "manipulators": [
        {
            "from": {
                "key_code": "caps_lock",
                "modifiers": {
                    "optional": [
                        "any"
                    ]
                }
            },
            "to": [
                {
                    "key_code": "left_control"
                }
            ],
            "to_if_alone": [
                {
                    "key_code": "escape"
                }
            ],
            "type": "basic"
        }
    ]
},
{
    "description": "Change left control to control if pressed with other keys, to escape if pressed alone.",
    "manipulators": [
        {
            "from": {
                "key_code": "left_control",
                "modifiers": {
                    "optional": [
                        "any"
                    ]
                }
            },
            "to": [
                {
                    "key_code": "left_control"
                }
            ],
            "to_if_alone": [
                {
                    "key_code": "escape"
                }
            ],
            "type": "basic"
        }
    ]
}

...omitted...
You can see what my karabiner.json file looks like here. Once you have that set up, the Complex Modifications tab in Karabiner should reflect your changes. Don't worry about the third modification, we'll cover that later.
Linux
Surprisingly, this is a bit easier to accomplish on Linux. Start by remapping Caps Lock to Control with setxkbmap:
setxkbmap -option ctrl:nocaps
Now to get the magical Escape/Control behavior install and configure the xcape utility:
sudo apt-get install xcape
xcape -e 'Control_L=Escape' -t 100
Play around with the -t flag, which controls the timeout (in milliseconds) after which xcape will no longer generate a keypress event for the Escape key. I think the sweet spot is somewhere between 100-250ms.
Note: I'm working on a Debian distribution with a Cinanamon desktop environment, so your mileage may vary on other distros/desktop environments.
Relocating the delete key
The most foreign feeling change on the HHKB is the position of the delete key. Instead of being on the same row as the number keys, it's traded places with the pipe/backslash key and sits directly above the return key. The first few hours I was constantly reaching too far with my pinky and leaving backslashes everywhere, but it really didn't take long to adjust. Now I actually really like it. The problem is when jumping between the HHKB and MacBook, I'm either deleting things when I mean to type a backslash or typing backslashes when I really want to delete.
macOS
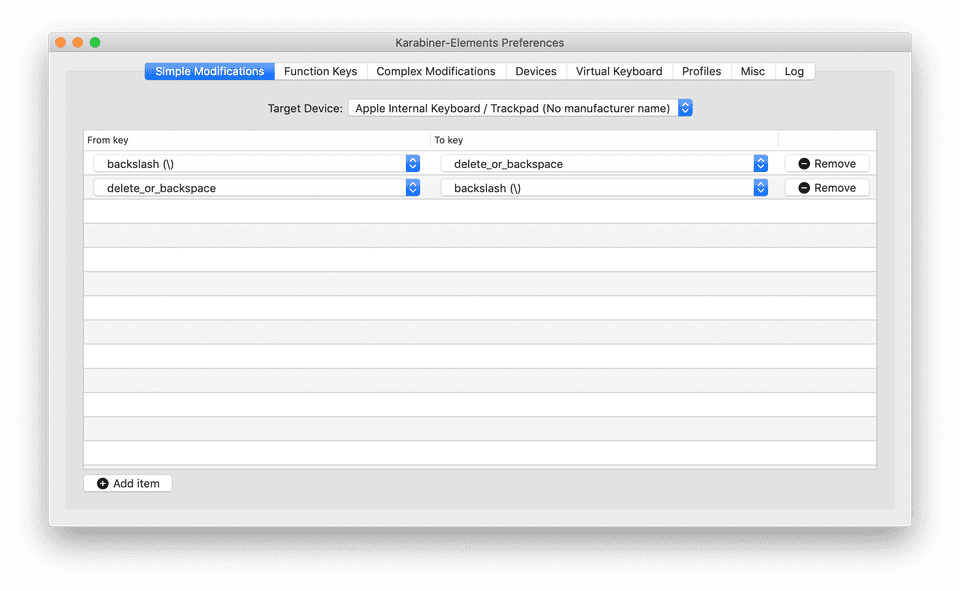
It turns out this can easily be handled by Karabiner. On the Simple Modifications tab, select the Apple Internal Keyboard device and then add two modifications that swap the backslash and delete keys. If you don't select a device, the modifications get applied to all devices, which will swap those keys the next time you use an HHKB and be extremely confusing. Trust me.
Linux
I haven't explored this since the only keyboard I use with my Linux workstation is the HHKB, which doesn't require any modifications. When I SSH to this machine from my MacBook, the modification is applied before the key gets sent to the workstation so no modifications are needed there either.
Better Arrow Keys
Although I avoid using the arrow keys whenever possible, sometimes it can't be avoided. Editing an email or Google Doc come to mind. The best approach I've found so far is to map the right Command key (or Linux equivalant) plus H, J, K, and L for Vim style navigation. This enables one-handed arrow-keying without taking your hands off the home row. Even if you're not a regular Vim user, this setup is pretty easy to get used to and I find it much, much more pleasant than the physical arrow keys.
macOS
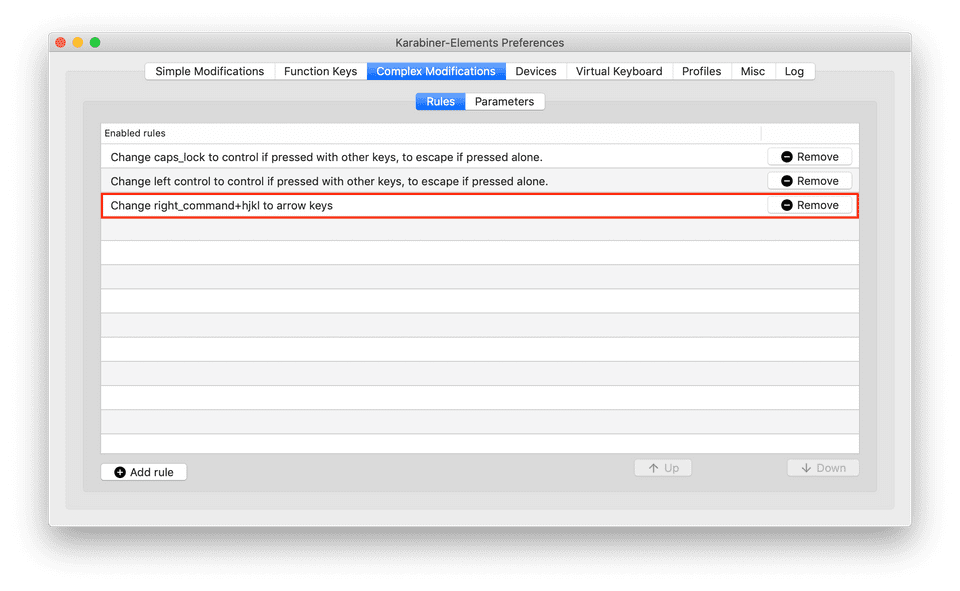
Back on the Complex Modifications tab in Karabiner, this is one of the included modifications so no need to manually edit the Karabiner config. Click Add Rule and then enable "Change right_command+hjkl to arrow keys." Once enabled, it should show up along the modifications we made earlier.
Linux
On Linux this one is slightly more involved. The first thing to do is find the keycode for the modifier key you want to use. I'm not sure what the official name of this key is on all layouts, but I'm referring to whatever is directly right of the spacebar.
An easy way to find the keycode is to use the xev utility:
xev
This will print the contents of X events, including the keycode associated with a key when it's pressed. Press the modifier key a few times and look for the KeyPress event, which will contain the keycode. On my keyboard, the keycode is 108. When you're done, you can use Control+C to kill the xev process.
Next let's make a file to store our new mapping so we don't have to type everything again in the future.
touch ~/.xmodmap
Now add the following to the new file (using Vim, of course :P):
Be sure to use the correct keycode you found with xev.
keycode 108 = Mode_switch
keysym h = h H Left
keysym l = l L Right
keysym k = k K Up
keysym j = j J Down
Now apply those changes using xmodmap:
xmodmap ~/.xmodmap
Closing Thoughts
These thoughts are incomplete as of July 21, 2019
If you have any questions or suggestions for making this better, tweet at me: @troy_carlson
Topics
- Vim
- HHKB
- Karabiner Elements
- xmodmap
- Vimium
- Linux
- Dotfiles management
- Of course vim and keyboard optimzation won't make you 10x faster...it just makes me happier...type at the speed of thought. Using your mouse and arrow keys is something you don't realize you hate until you experience an alternative.
- If you had asked me a few years ago if I felt maintaining this setup was worth the trouble, I would have emphatically said no. However, I have since decided it is worth the trouble.
- Switching between systems. How to maintain muscle memory across OS and keyboard layout


